Wednesday, August 22, 2012

Time for a brand new year!


Welcome back! We hope you are as excited for the new year as we are. During the year we will publish photos and detailed explanations and outlines of our projects here. Feel free to scroll through some of our earlier years' work  to get an idea of how this blog works. You'll be able to hear about upcoming events, plans, trips, and goals, and be able to see some candid shots of your children while they work and play. You will also get to learn about the books we're reading and the vocabulary words we're discussing, what we've been baking and building, and be able to leave comments and suggestions.

Time for the fun to begin!

Anxious for Spring

January included several unenjoyable snow storms, ice storms, and otherwise ugly weather. We tried to take advantage of some long days and some nice fluffy snow (not yet melting into soggy mud) for some fun times outside building snowmen, making "snow art," tossing snow balls, and various forms of sledding (including one less successful attempt to try body sledding...). We're definitely ready for some nice days where we can get out some energy and enjoy some time playing on the playground and running races in the field.

In the meantime we've been trying to keep everyone occupied in the class room, and we've found some fun ways to do it! We have been expanding our repertoire in felt crafting and recently did a unit on making our own ugly dolls (because they're so ugly...they're cute). We began this unit by drawing a sketch of what our ugly doll would look like. Would it be big or small? Fat or skinny? Multicolored or monochrome? The options were endless and everyone quickly got involved. When the sketch was complete, including the application of the final color scheme, we constructed a true-to-size prototype from construction paper. This step actually took a few days, and we expected the students to take their time during this process, instead of viewing it as the precursor to the final step.

When the construction paper prototypes were complete, we got to work with our felt. We started by tracing the existing prototypes onto the felt and creating a front and back. Though this is the first step, attaching the two halves was the last thing we did. The students chose which side they wanted to be the front and began to embellish their dolls with expressions, eyes, distinguishing marks, and clothes. Even those not inclined to sew had a good time pulling together their projects. Ms. Alison was nice enough to bring in her sewing machine from home so the final step of the project was (relatively) quick and painless, and the students who were interested were given the opportunity to learn a little bit about how to use a sewing machine.

We've been keeping busy in other ways as well. For the past few weeks we've had a special guest in our classroom, Chelsea Faust. Ms. Chelsea is finishing up her education to become a nutritionist, and she's been completing her practical with Boyd's Arts and Enrichment Program. Her goal is to educate early about how to choose healthy foods, and to know what we're putting in our bodies.

We started this unit by creating our own food pyramid, following the revised structure. We discussed who created the pyramid and how the amount of each group was determined. We created a large triangle out of corrugated cardboard, painted each section the appropriate color, and spent some time sorting through magazines until we had acquired enough pictures to paste into our pyramid, the selected food corresponding with its group. As a wrap up, we discussed how no food is inherently bad, and how we can make better choices when it comes to what we eat.

Our second week has focused on the importance of grain. We kicked it off by making some homemade pizza with live yeast before migrating into the bread area. Ms. Alison recently attended a class at Enrico's in the strip about how to make bread, and the history of bread. They hold these classes once a month. Check it out. So she was more than prepared to share with us all the amazing things that have gone into making bread as we know it. We explored the differences between white, wheat, rye, and rice flour, and talked about flour allergies. Then we made banana bread. And then we made apple bread. And then we made foccacia bread. And then we made zucchini and carrot bread. And it was all delicious.

In an effort to kick of better and more adventurous eating, we've also created an Adventures in Eating Passport. Every time a child tries a food they've never tried before they get a stamp in their passport and when they've accumulated 10 stamps they get to choose what they have for snack. We've tried apricots, kiwi, mango, papaya, pomegranate, chickpeas, olives, tomatoes....Some of our kids are more adventurous than others, but we hope they're enjoying the taste testing so far!

We've also enjoyed making our own hummus and fruit smoothies. I can't wait to see what we're going to get to eat next....

Monday, December 13, 2010

Romancing Winter

We've been trying to stay busy and keep our minds off of the cold weather and lack of outside play time. October finished up for us with a bang; we had a great Halloween party and had fun creating the final festive touches.


It was a long day of fun, and sometimes we just need a break from all that excitement. Below, some of our boys take a break from art, craziness, and craft to play Stratego. We try to give all parts of the brain equal exercise.


We just had to include this picture, done by a first grader (that's her self portrait...the little one staring adoringly up at Miss Alison. Just in case anyone was confused, Alison comes with an "A" on her stylish dress. That's right. Boyd's very own superhero). It was just too cute. We pinned it up in the room and it makes us smile every time we see it.


Our play space has undergone some recent changes, probably due to our less frequent outdoor time and are increased amount of play time indoors. Our Snack Shack underwent some ownership changes and some expansions. Our Boyd After School program is now the proud owner of a Craft Corner, a bank (that's the Boyd Community Center Bank) and an animal shelter. Sadly, this turnover means we've lost the Paint Place and our Snack Shack has become more like a vending machine, but the businesses are fully staffed and operational. The kids have a blast, and a book store is in the making.


With Halloween behind us, the kids were ready to move on to the next holiday. We had some great Thanksgiving projects, many of which were self-directed and created. Our older girls pulled together a papier mache cornucopia, which was absolutely beautiful. When it had finally dried, they spent several days painting it until it looked just right.

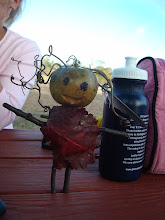
While that was going on, one of our students decided holiday-themed coasters were in order. She painstakingly cut out pieces of felt to create holiday icons. The completed set had four designs and eight coasters. They were assembled using needle and thread. I love the turkey's little face.


We couldn't celebrate the holidays forever, however, and after a while we needed a basic art project we could really sink our teeth into. Using traditional Mexican masks as our inspiration, we spent several weeks drawing out how we wanted our masks to look, making papier mache molds of our faces, and embellishing them until they were the decorative masks you see below.

The children were free to elaborate on their projects as they saw fit. The guidelines they were given included:

*Must combine two or more animals
*Must use good use of color and pattern

The result of their hard work:


While gorgeous, the real fun of the project was the grunt work that went into the original construction. First, we had to convince them that they really wanted to be papier mached. This was harder than you might expect.

The tools of the trade: An Endless Amount of Papier Mache Miss Alison and Ms. Heather Were Forced to Cut into Small Squares Using Child-Safe Scissors


And a Giant Bowl of Water

And Many Manual Laborers


The kids started by choosing a partner. Groups of younger children frequently had an older pair stationed nearby or received help from Miss Alison or Ms. Heather. One student was designated as the model with the understanding that both would have a chance to be papier mached and to papier mache. With old t-shirts protecting their heads and their clothing, we got right to work.

A paper towel was laid over the model's face and spritzed gently (or liberally, depending on who was in charge of the spritzing) to make the removal of the completed mask easier and less painful.


Then the students dipped the squares of papier mache in the water and smoothed them onto their model.


Patience was definitely in order. To make the masks strong, they needed multiple layers of papier mache, and before the mask could be removed it had to dry enough to hold its shape once removed.


Testing for dryness:


The final, inevitable, removal:


The drying finished product:


When all the drying was complete, the students were ready to launch into the creation of their previously drawn mask ideas. We used paper, cardboard, tape, plastic...whatever we could find to give our masks the desired shape and attributes.


The art these guys turn out is amazing! We loved having their masks decorate our room, and hope you enjoy them just as much in your home.

With the masks complete, and MORE holidays just around the corner, we were ready to move on. Move on to something...shiny. The more sparkle the better, in my book. Except for glitter. Because glitter never seems to go away once you introduce it to your environment. This year, in an effort to do all of us who have to vacuum a favor, we stayed away from glitter.

That being said, it turns out that sequins also have a tendency to travel...

Friday, October 15, 2010

The Inevitable Fall

We're sad to see the sunshine leave us, but we know the autumn will bring plenty of opportunities for us to explore art and fun. Especially when this is what it looks like outside:

Pretty dreary, but no worries. We find plenty to do inside. And with Halloween creeping up on us, there's plenty of scary fuel for us to use.

One of our perpetually favorite activities is the scary Boyd Story. Dark and rainy days are the perfect time for it. Miss Alison is the queen of the story, and I suspect she has seen endless scary movies she pares down to rated-G and inserts the individual children as main characters. These stories never seem to lose the kids' interests and they will periodically go on for days. When Alison gets tired of telling the story, we pass it around from child to child or ala Choose Your Own Adeventure books, we take votes.

Of course, October in Pittsburgh is pretty much like a moody teenager, and we have just as many gorgeous days as we do disgusting -- there is no such thing as moderation in October! And we've had some great days outside and we've certainly taken advantage of them.

Following our felt animals last month, and the apple dolls we made as well, we had some students interested in combining the two projects and making their own felt dolls.

This one was hand stitched by a first grader. The doll, the hair, the clothes, the shoes were all sketched and cut out by her as well. I offered her the hot glue gun, but she was interested in learning how to sew. Her face was drawn on using a permanent marker.

Here is her before photo opp. She's wearing the red dress for modesty's sake.

But we have lots of children who are interested in spending their time outside doing traditional drawings. The one below was done by a kindergartner.


In case you need a comparison:

I think it's pretty phenomenol, actually. I love the rings on the corrsponding planets and he was sure to tell me he was including satellites. It was a totally self-motivated picture; I believe he told me it was something he was learning with his father.

We try to get in plenty of time reading as a group, and reading in our own time as well. We picked a whole bunch of creepy stories to read for October, and one of the first ones we picked out was from a book of stories based on actual events. The first we read was the Oak Island Treasure, and it really ran away with the kids' imagination. After talking about why the treasure remained a mystery and what could be done to make it happen, we decided to make some treasure maps of our own.

First we crumpled the paper repeatedly, until it was nice and soft. We took some time to make the edges ragged and then began the drawing. Most started with pencil and added color later on. All were encouraged to use a compass rose and create a key for the reader to follow.


After the maps were complete, we started in with the fun part...making our maps look authentic!

We mixed together some instant coffee and some water (Important Note: It turns out this "paint" will molder...don't succumb to the temptation to keep it around for very long). The kids each got their own little pot of coffee paint and they got to work.


The maps will need to sit for some time to fully dry. If you're at home and feeling adventurous, I have also successfully baked paper in the oven to create an aged effect.


And when they're dry? Spectacular results:


We've been finishing up The Magician's Nephew, and have started reading Horror at the Haunted House, and have some more fun books up for consideration; we know there will be more opportunity to read as we are forced to spend more time inside. Our Words of the Day this month have been Spook-Tacular and include these:

*Nefarious

*Ghoul

*Malevolent

*Pernicious

*Macabre

*Ominous

We have the Best Halloween Party Ever coming up, so stay tuned for some great photos and stories from that!